Tuesday, October 16, 2018

Stornes Cowl - Free Crochet Pattern


Spincycle Independence Yarn
This pattern was born from one skein of Spincycle Independence yarn that was gifted to me by my daughter. I've had it out for a while now wondering how to best use it so I can enjoy the softness and colours!

Along comes Stornes Cowl. It's a short cowl (only 26 inches; 66 cm in length) so it hugs ones neck nicely.


It's a great pattern for that one skein of worsted/aran weight yarn (200 yards; 183 meters) that you have always wanted to use but can't find the right pattern.


Here is some basic information you need to create this cowl ...


SKILLS REQUIRED
Chain
Single Crochet
Double Crochet
Shell
V Stitch
Puff Stitch

SIZE
One size approximately 8 x 26 inches (20 x 66 cm)

HOOK SIZE
US size I/9 (5.5 mm)

GAUGE
 13 dc and 7 rows is 4 inches (10cm)

 YARN REQUIREMENTS
200 yards (183 meters ) worsted weight yarn

Sample crocheted with
Spincycle Yarns Independence; 100% American wool; 200 yards (183 meters) in 100g (3.53 ounces); Color: Idle Nights

OTHER MATERIALS
4 - 7/8 inch buttons (22mm) and matching thread
Tapestry needle

NOTES
Written in US Terminology
To create a wider or narrower cowl chain a  multiple of 6 + 5
Turn at the end of each row unless indicated otherwise
Want a chart? Find it on Ravelry here Stornes Cowl


Stornes is a rocky peninsula near the Larsemann Hills region of Antarctica. Why this name? Stornes features rich mineral deposits of boron and phosphate that create beautiful striations in the rockwork. Much like this Spincycle yarn creates in this pattern.

ABBREVIATIONS

beg-ch    Beginning chain
ch(s)       Chain(s)
ch-sp      Space formed by chain(s)
cm          centimeters
dc           Double crochet

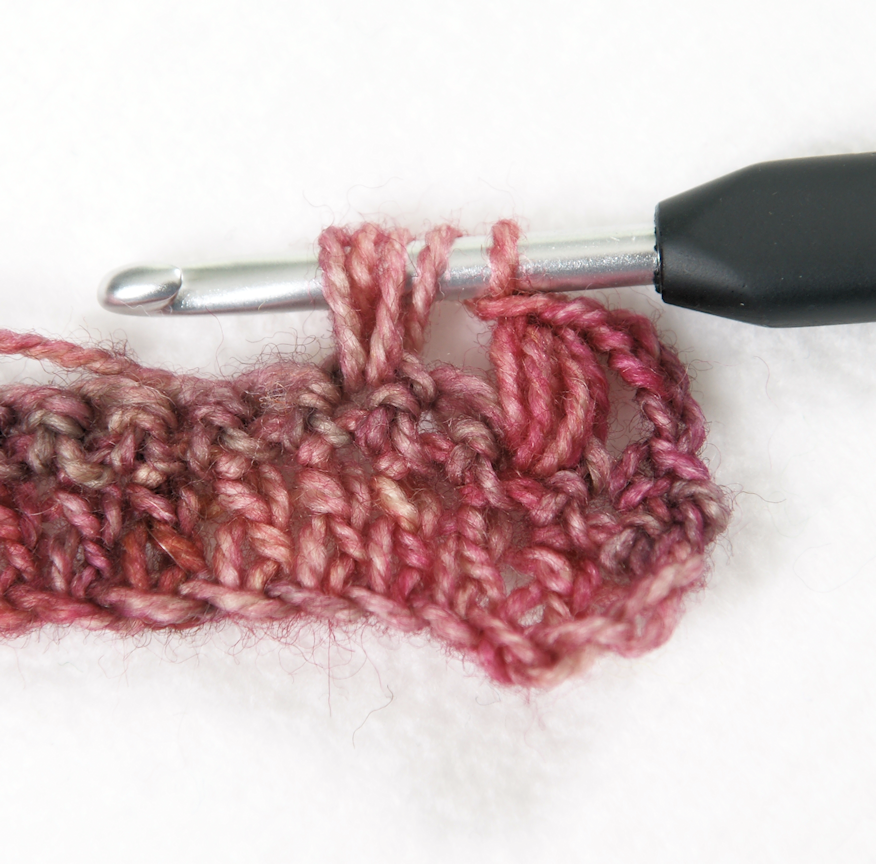
Puff3       (Yarn over hook, insert hook into specified stitch, yarn over again and draw up a long loop) three times, yarn over hook and pull through all 7 loops on hook, ch 1. Find a picture tutorial of the Puff Stitch here Puff Stitch

sc           Single crochet
shell        3 dc in indicated st
sk           Skip
sl st        Slip stitch
tc           Turning ch
Vst         (dc, ch 1, dc) in indicated stitch


Now for the actual pattern ...


STORNES COWL

Ch 23.

BUTTONBAND
Row 1:  Sc in 2nd ch from hook, sc in each ch to end. (22 sc)
Row 2:  Ch 1, sc in each sc to end.
Repeat row 2 three more times.

MAIN PATTERN
Row 1: Ch 3, 2 dc in first sc, [sk 2 sc, shell in next sc] to end. (7 shells)
Row 2: Sl st in first dc, sl st in next dc, ch 4, dc in same dc, [sk 2 dc, Vst in next dc] to end. (7 Vst)
Row 3: Sl st in first dc, sl st in ch-sp, ch 3, 2 dc in same ch-sp, [shell in next ch-sp] 6 times, shell in tc.

Repeat rows 2 and 3 until cowl measures 24 inches (61 cm) or desired length, ending with row 3.


EDGING
Row 1: Ch 4, sk first dc, dc in next dc, [ch 1, sk 1 dc, dc in next dc] 10 times, ch 1, dc in tc. (11 ch-sp)
Row 2: Ch 1, sc in first dc, [ch 2, Puff3 in same dc, ch 1, sk 1 dc, sc in next dc] 4 times, ch 2, Puff3 in same dc, ch 1, sc in tc.

FINISHING
Break and fasten off yarn.
Weave in ends.
Block cowl.
Sew buttons onto buttonband using the chain spaces on row 1 of edging as buttonholes.

A note about the buttons ... these are ceramic buttons from Kaminski Pottery in British Columbia, Canada. They are beautiful and so unique. You can find her on Instagram here.


Enjoy!


Disclaimer:
This post may contain affiliate links.
When you purchase something using these links a small amount of the sales price goes to me to help keep this site, and the patterns on it free. You do not pay any extra for any item you purchase. 
 

Thursday, October 4, 2018

That Wonderful Feeling ....

... of finishing a project. Whether it's crochet or knit, I just feel so excited when a project is off the hook or needle! I guess it's because I now have a new accessory or garment that I can wear or gift and it's unique. No one else has one just like it!

This week I finished a crochet shawl. 


This is yarn I bought at a San Francisco Yarn Shop - Atelier Yarns and is aptly named SF Fog. It's hand dyed by a local dyer and I believe is only available at this yarn shop. It is a light fingering weight yarn with merino, angora, and nylon. It just glows. So I've called this new shawl pattern Midnight SoirĂ©e.


Do you want to be one of the first to crochet this shawl? Head over to my group on Ravelry to read all the particulars (deadline to complete the shawl is November 5th). I would love to have to try out the pattern!

Happy Crocheting!

Thursday, September 27, 2018

Stord Scarf - Free Crochet Pattern


I've had this yarn in my bin for quite some time, just waiting for the perfect project. It's 100% wool and fingering weight that was hand dyed by Melanie of Baad Mom Yarns. Unfortunately, she doesn't offer this base anymore but there are some other lovely fingering weight yarns on her website.


Stord Scarf is an easy to memorize, two row pattern with a delicate flower edging created with puff stitches. Never created a puff stitch before ... no worries ... you can find my picture tutorial here.


Some particulars for crocheting the scarf ...


SKILLS REQUIRED
Chain
Single Crochet
Double Crochet
V Stitch
Puff Stitch

SIZE
One size approximately 6.5 x 54 inches (17 x 137 cm)
Easily customize to a different width or length

HOOK SIZE
US size 7 (4.5 mm)

GAUGE
18 dc and 10 rows is 4 inches (10cm) though it's not critical. Have fun playing around with different yarn weights and hook sizes.


YARN REQUIREMENTS
420 yards (385 meters) fingering weight yarn

Sample crocheted with
Baad MomYarns Inverness; 100% merino; 250 yards (229 meters) in 50 g (1.76 oz); 2 skeins in color Berries


OTHER MATERIALS
Tapestry needle

NOTES
Written in US Terminology
Pattern is both charted and written
Turn at the end of each row unless indicated otherwise. 
To create a wider or narrower scarf chain a  multiple of 12.


Let's get started ...

Ch 36.
Row 1: Sc in 2nd ch from hook, ch 1, sk 1 ch, sc in next ch, [ch 3, sk 2 ch, sc in next ch] 10 times, ch 1, sk 1 ch, sc in last ch.

Row 2: Ch 3, sk 1st sc, [Vst in next sc] 11 times, dc in last sc.

Row 3: Ch 1, sc in 1st dc, ch 1, sc in ch-sp of Vst, [ch 3, sc in ch-sp of Vst]10 times, ch 1, sc in tc.

Repeat rows 2 and 3 until scarf measures 50 inches; 127 cm, ending with row 2.


EDGING
Row 1: Ch 3, dc in first dc, [dc in next dc, dc in ch-sp, dc in next dc] to end, dc in tc. (35 dc)

Row 2: Ch 1, sc in first dc, ch 4, sk 3 dc, sc in next dc, ch 5, sk 2 dc, sc in next dc, ch 4, sk 3 dc, [(sc in next dc) 2 times, ch 4, sk 3 dc, sc in next dc, ch 5, sk 2 dc, sc in next dc, ch 4, sk 3 dc] 2 times, sc in tc.

Row 3: Ch 3, [Puff2 in 4 ch-sp, ch 3, (Puff2, ch 5, Puff2) in 5 ch-sp, ch 3, Puff2 in 4 ch-sp, ch 1] 2 times, Puff2 in 4 ch-sp, ch 3, (Puff2, ch 5, Puff2) in 5 ch-sp, ch 3, Puff2 in 4 ch-sp, dc in last sc.

Row 4: Ch 1, sc in first dc, [3 sc in 3 ch-sp, 5 sc in 5 ch-sp, 3 sc in 3 ch-sp, sc in 1 ch-sp] 2 times, 3 sc in 3 ch-sp, 5 sc in 5 ch-sp, 3 sc in 3 ch-sp, sc in tc.


Row 5: Ch 3, sk 4 sc, (Puff3 in next sc, ch 3) 4 times, Puff3 in next sc, sk 3 sc, dc in next sc, [sk 3 sc, (Puff3 in next sc, ch 3) 4 times, Puff3 in next sc, sk 3 sc, dc in next sc] 2 times, do not turn.

Work 3 sc in each dc and 1 sc in each sc along long edge of scarf to beg-ch.

Row 1: Ch 3, work 35 dc evenly along beg-ch.
Work rows 2 to 5 of EDGING.

Work 3 sc in each dc and 1 sc in each sc along long edge of scarf to first Puff3 stitch. Sl st into top of Puff3 stitch.
Fasten off and break yarn.

FINISHING
Weave in ends.
Block scarf.


And you will need a list of the abbreviations I've used ...


beg-ch       Beginning chain
ch(s)          Chain(s)
ch-sp         Space formed by chain(s)
cm             centimeters
dc              Double crochet
Puff2          (Yarn over hook, insert hook into specified stitch, yarn over again and draw up a long loop) twice, yarn over hook and pull through all 5 loops on hook, ch 1.

Puff3          Same as Puff2 but work instructions in parentheses 3 times (7 loops on hook)
sc              Single crochet
sk              Skip
sl st            Slip stitch
tc               Turning ch
Vst             (dc, ch 1, dc) in indicated stitch

Enjoy creating your scarf and post a picture of your creation on Instagram and tag me @designsbycherylchow


Disclaimer:
This post may contain affiliate links.
When you purchase something using these links a small amount of the sales price goes to me to help keep this site, and the patterns on it free. You do not pay any extra for any item you purchase. 


Saturday, September 15, 2018

Puff Stitch

I really love the puff stitch ... the smoothness of it compared to the popcorn stitch or "double crochet 5 together in the same stitch" type stitch. The puff stitch stands out from the background and can be really puffy if one pulls up many loops. 

I've used the puff stitch in my Lonicera Scarf 


Lonicera Scarf © Designs By Cheryl Chow, LLC


A 5 loop puff stitch and 7 loop puff stitch  will be used in my upcoming Stord Scarf pattern (soon to be released).


Following is a picture tutorial on how to create this versatile stitch. 

Step 1: Yarn over hook, insert hook into stitch, pull up an elongated loop. I like to make the loop about the height of a double crochet.


Step 2: Yarn over hook, insert hook into the same stitch, pull up another elongated loop. There are now 5 loops on the hook.


For a 5 loop Puff Stitch (Puff2 in the Stord Scarf pattern)

Step 3: Yarn over hook, pull through all 5 loops on the hook.


Step 4: Chain 1. The 5 loop puff stitch is complete.


For a 7 loop Puff Stitch (Puff3 in the Stord Scarf pattern)

Step 3Yarn over hook, insert hook into the same stitch, pull up another elongated loop. There are now 5 loops on the hook.


Step 4: Yarn over hook, pull through all 7 loops on the hook.


Step 5: Chain 1. The 7 loop puff stitch is complete.


Of course one can always make a puffier puff stitch by pulling up more loops and then working steps 4 and 5 above.

Happy Crocheting!


Disclaimer:
This post may contain affiliate links.
When you purchase something using these links a small amount of the sales price goes to me to help keep this site, and the patterns on it free. You do not pay any extra for any item you purchase. 

Thursday, September 6, 2018

Fall is Coming ...

I can feel it in the air every morning. Fall Is Coming! 

I have two dogs that think they need to get up at 5 am, yikes!


And when I do get up to take them out (not at 5 am btw) it is so crisp and cool outside. I even notice that the leaves are starting to change on some of the trees. I just love this time of year ... and start to think about all the woolly things I'm going to wear in the next month or two.


Crispin Poncho would be a great accessory for Fall. Not only is it cozy, but the leafy structure of this design paired with a wool and acrylic blend yarn gives it breathability and warmth at the same time. 


Crispin Poncho in I Like Crochet, October 2018 Issue


Buttons on Poncho Neckline
Buttons on the poncho neck allow one to wear Crispin with or without the hood depending on how crisp the weather may be. One could also permanently attach the hood to the poncho, leaving off the buttons and buttonholes.


The leaf design is created with a front-post and back-post with a shell in between. After working the 6 row repeat a few times it becomes much easier and I found I could even memorize it so I didn't have to keep consulting the pattern.


Crispin Poncho in I Like Crochet

Some details about the pattern ...


Skill Level: Intermediate
Size: 30″ from shoulder to hem x 40″ wide
Gauge: 14 sts and 8 rows = 4.25″ 11 cm in dc; 20 sts and 8 rows = 3.75″ 9.5 cm in leaf pattern after wet blocking
Yarn: Berroco Vintage (52% Acrylic, 40% Wool, 8% Nylon; 217 yards 198 meters/100 grams): 5175 Fennel (13 balls)
Hook: US size I/9 (5.5 mm)
Notions: Removable markers, tapestry needle, eight 3/4” buttons, sewing needle, thread to match buttons


I Like Crochet, October 2018
There are some other really great patterns in the October Issue of I Like Crochet so go check out the magazine!

I especially like ...

Macoun Leaf Shawl by Angèle Lumière

McIntosh Sweater by Tian Connaughton
Allspice Tote by Debra Arch


Until next time, 
Happy Crocheting!!


Disclaimer:
This post may contain affiliate links.
When you purchase something using these links a small amount of the sales price goes to me to help keep this site, and the patterns on it free. You do not pay any extra for the item you purchase. 

Thursday, August 30, 2018

Kaitlyn Cowl Crochet Pattern

This cowl has been published on Ravelry for quite some time. Hope those who don't use Ravelry enjoy this free crochet pattern.

Buttons on the Kaitlyn Cowl allow it to be worn in a multiple of ways. Twist the cowl once and button to make a moebius. Leave out the twist to make an infinity scarf. Leave off the buttons and wrap as desired. Three simple stitch patterns work up quickly and look elegant in a kettle dyed fingering weight yarn.

Kaitlyn Cowl

YARN REQUIREMENTS
420 yards of fingering weight yarn
Kaitlyn Cowl

SKILLS REQUIRED
Single crochet, half-double crochet, double crochet, chain

FINISHED SIZE
Width of 6”
Length of 60”
Measured after blocking

GAUGE
6 sc in 1” using hook size E (3.5mm)

HOOK SIZE
Size E (3.5mm) and F (3.75mm)

OTHER MATERIALS
3 –1” buttons
Tapesty needle

ABBREVIATIONS 
ch
Chain
sc
Single Crochet
hdc
Half-double Crochet
dc
Double crochet
st
Stitch
sk
Skip
Vst
Hdc, ch1, hdc in same st

STITCHES
Begonia Stitch
Row 1: Using hook size F (3.75mm) ch2, *sk2 sc, Vst in next sc, sk1 sc, Vst in next sc, sk1 sc, Vst in next sc; Repeat from * 3 more times (6 sc left unworked); sk2 sc, Vst in next sc, sk1 sc, Vst in next sc, hdc in last sc, turn (Total of 14 Vst)

Row 2: Ch2, *Vst in ch1 space; Repeat from * across, hdc in top of ch2, turn
Repeat Row 2.


Spaced Iris
Row 1: Using hook size F (3.75mm) ch3, 1 dc in next sc, sk2, *5dc in next sc, sk2, (1dc, ch1, 1dc) in next sc, sk2; Repeat from * to last sc, 3dc in last sc, turn

Row 2: ch3, 1dc in 2nd dc, *(1dc, ch1, 1dc) in ch1 space, 1dc in each of the 3 dc at center of 5dc group; Repeat from * to ch3, (1dc, ch1, 1dc) in top of ch3, turn

Row 3: ch3, 2dc in ch1 space, *(1dc, ch1, 1dc) in center of 3dc group, 5dc in ch1 space; Repeat from * to ch3, (1dc, ch1, 1dc) in top of ch3, turn

Row 4: ch3, 1dc in ch1 space, *3dc in center of 5dc group, (1dc, ch1, 1dc) in ch1 space; Repeat from * to last dc, 1dc in last dc, dc in top of ch3, turn

Row 5: ch3, 1dc in next dc, *5dc in ch1 space, (1dc, ch1, 1dc) in center of 3dc group; Repeat from * to ch3, 3dc in top of ch3, turn
Repeat Rows 2 to 5.

Palm Leaves
Row 1: Using hook size F (3.75mm) ch1, *sc, ch2, sk2; Repeat from * to last sc; sc, turn

Row 2: ch3, 1dc in next sc, *3dc in next sc; Repeat from * to last sc; 2dc in sc, turn

Row 3: ch1, sc in next dc, *ch2, sc in middle dc of group; Repeat from * to beginning ch3; ch2, sc in top of ch3
Repeat Rows 2 and 3


KAITLYN COWL INSTRUCTIONS
Using hook size E (3.5mm), chain 35
Row 1: Sc in 2nd ch from hook, sc in each ch across, turn (34 sc)
Row 2: Ch1, sc in each sc across, turn

Repeat Row 2 ~ 7 more times (8 rows of sc worked)


MAIN PATTERN
Choose a stitch pattern from above and follow instructions until cowl is as long as desired. Leave about 20 yards of yarn for the buttonhole band.

Kaitlyn Cowl 
BUTTONHOLE BAND
Setup Row: Using hook size E (3.5mm) ch1, work 34 sc evenly across the row, turn.
Row 1: Ch1, sc in each st across, turn
Repeat Row 1 ~ 3 more times (4 rows of sc worked)

Row 5: Ch1, sc in each of the next 5 sc, ch3, sk3 sc, sc in each of the next 8 sc, ch3, sk3 sc, sc in each of the next 8 sc, ch3, sk3 sc, sc in each of the next 5 sc, turn (3 buttonholes worked)

Row 6: Ch1, sc in each st across, turn (34 sc)
Repeat Row 6 ~ 3 more times

FINISHING 
Fasten off yarn.
Weave in ends.
Wet block your cowl.
When cowl is dry, sew on buttons spaced to match the buttonholes.


Disclaimer:
This post may contain affiliate links.
When you purchase something using these links a small amount of the sales price goes to me to help keep this site, and the patterns on it free. You do not pay any extra for the item you purchase. 


Friday, August 24, 2018

Crochet Projects - Part 2

Currently I'm having a little vacation in San Francisco with my wonderful husband. Doing some touristy things and enjoying time away together.

SF MOMA


As promised, two more shawl patterns available now on Ravelry. First is Stordal Shawl.This shawl is a little unique because the two colored main part of the shawl is worked from one end to the other and then the natural colored border is worked afterwards along the curved edge. I'm really happy with how this turned out and I love the colors that Caroline used in her shawl.


Stordal Shawl

Stordal Shawl

Next is Salhas Shawl. When I saw Artistic Lilly's gorgeous hand dyed yarn combination she posted on Instagram, I just new I had to make something with them. 


Artistic Lilly's Versatile Fingering sock yarn


These three skeins are sock weight yarns in colors Saddle Up, Calamity Jane, and Buffalo Trail. You can always go check her website to see if she has them in stock!

Salhas Shawl is a right angle triangle shape with stripes in two distinct crochet patterns. It is worked from the narrow point up to the wide edge and ends up being approximately 34" deep and 82" wingspan. A good sized shawl.


Salhas Shawl

Salhas Shawl 

I am now off to enjoy San Francisco for a few more days. Happy Crocheting and Knitting!
~Cheryl